Baking bread is an ancient art that has captivated home cooks and professional bakers alike for millennia. The allure of a perfectly crusty loaf with a soft, airy interior is undeniable. Yet, for many, achieving bakery-quality results at home remains elusive. Mastering the intricacies of bread making requires understanding the science behind fermentation, gluten development, and baking techniques. By delving into these fundamental principles, you can elevate your bread-making skills to rival those of seasoned professionals.
Understanding flour types and gluten development
At the heart of every loaf lies the flour, the foundation upon which great bread is built. Different flour types yield distinct results, and understanding their properties is crucial for achieving the desired texture and flavour in your bread. Wheat flour, the most common type used in bread making, contains two proteins – glutenin and gliadin – which combine to form gluten when mixed with water.
Gluten development is essential for creating the structure that allows bread to rise and maintain its shape. High-protein flours, such as bread flour, contain more gluten-forming proteins and are ideal for crusty, chewy loaves. In contrast, all-purpose flour has a lower protein content and is suitable for softer breads and rolls.
When selecting flour for your bread, consider the protein content and how it aligns with your desired outcome. For a rustic country loaf with a open, irregular crumb, opt for a high-protein bread flour. For a softer sandwich bread, all-purpose flour or a mix of bread and all-purpose flour may be more appropriate.
The quality of your flour directly impacts the quality of your bread. Invest in good-quality flour from reputable sources to ensure consistent results.
To further enhance gluten development, many professional bakers employ techniques such as autolyse, which involves mixing the flour and water before adding other ingredients. This process allows the flour to fully hydrate and initiates gluten formation, resulting in a more extensible dough that’s easier to work with.
Mastering fermentation and yeast cultivation
Fermentation is the magical process that transforms a simple mixture of flour, water, and yeast into a living, breathing dough. Understanding and controlling fermentation is key to producing bread with complex flavours and optimal texture. The type of yeast used, fermentation time, and temperature all play crucial roles in this process.
Sourdough starters: wild yeast cultivation techniques
Many professional bakers swear by sourdough starters for their unique flavour profile and natural leavening properties. Cultivating a sourdough starter involves capturing wild yeast from the environment and feeding it regularly with flour and water. This process requires patience and consistency but rewards you with a living culture that can be used to leaven bread indefinitely.
To create a sourdough starter, mix equal parts flour and water in a clean container. Leave it at room temperature and feed it daily with fresh flour and water, discarding a portion of the old mixture. Over time, the mixture will become bubbly and develop a pleasant, tangy aroma, indicating that the wild yeast has been successfully captured.
Temperature control for optimal fermentation
Temperature plays a critical role in fermentation. Yeast activity increases with warmth, leading to faster fermentation, while cooler temperatures slow down the process. Professional bakers often use temperature-controlled proofing boxes to maintain consistent conditions for their dough.
For home bakers, finding a warm, draft-free spot in your kitchen can suffice. Aim for a temperature range of 24-27°C (75-80°F) for optimal yeast activity. In cooler environments, you can create a makeshift proofing box by placing your dough in a turned-off oven with a pan of hot water to generate warmth and humidity.
Long vs. short fermentation methods
The duration of fermentation significantly impacts the flavour and texture of your bread. Short fermentation methods, typically lasting a few hours, are suitable for quick breads but may lack depth of flavour. Long fermentation, often lasting 12-24 hours or more, allows for the development of complex flavours and improved digestibility of the bread.
Many professional bakers use retardation , a technique where dough is fermented at low temperatures (usually in a refrigerator) for an extended period. This slows down yeast activity while allowing enzymes to continue breaking down starches into sugars, resulting in a more flavourful loaf.
Poolish and biga pre-ferments
Pre-ferments, such as poolish and biga, are partial dough mixtures fermented before being incorporated into the final dough. These techniques, widely used in professional bakeries, enhance flavour development and improve dough strength.
A poolish is a wet pre-ferment made with equal parts flour and water by weight, plus a small amount of yeast. It’s typically fermented for 12-16 hours at room temperature. A biga is similar but with a lower hydration, resulting in a stiffer consistency. Both methods contribute to a more complex flavour profile and improved keeping quality in the final bread.
Kneading techniques and dough hydration ratios
Kneading is the process of working the dough to develop gluten structure. While traditional hand-kneading can be effective, many professional bakers employ alternative techniques that can yield superior results with less effort.
Autolyse method for improved gluten structure
The autolyse method, mentioned earlier, is not only beneficial for gluten development but also reduces the overall kneading time required. After the initial rest period, the dough becomes more extensible and easier to work with. This technique is particularly useful when working with high-hydration doughs that can be challenging to knead traditionally.
Stretch and fold vs. traditional kneading
The stretch and fold technique has gained popularity among professional bakers as an alternative to traditional kneading. This method involves stretching the dough and folding it over itself at regular intervals during the bulk fermentation period. It’s particularly effective for wetter doughs and helps develop gluten structure while preserving the delicate air bubbles formed during fermentation.
To perform a stretch and fold, lightly wet your hands, then grab one edge of the dough, stretch it upwards, and fold it over the center. Rotate the bowl and repeat this process from all four sides. Perform this series of folds every 30 minutes during the first 2-3 hours of bulk fermentation.
Calculating and adjusting dough hydration
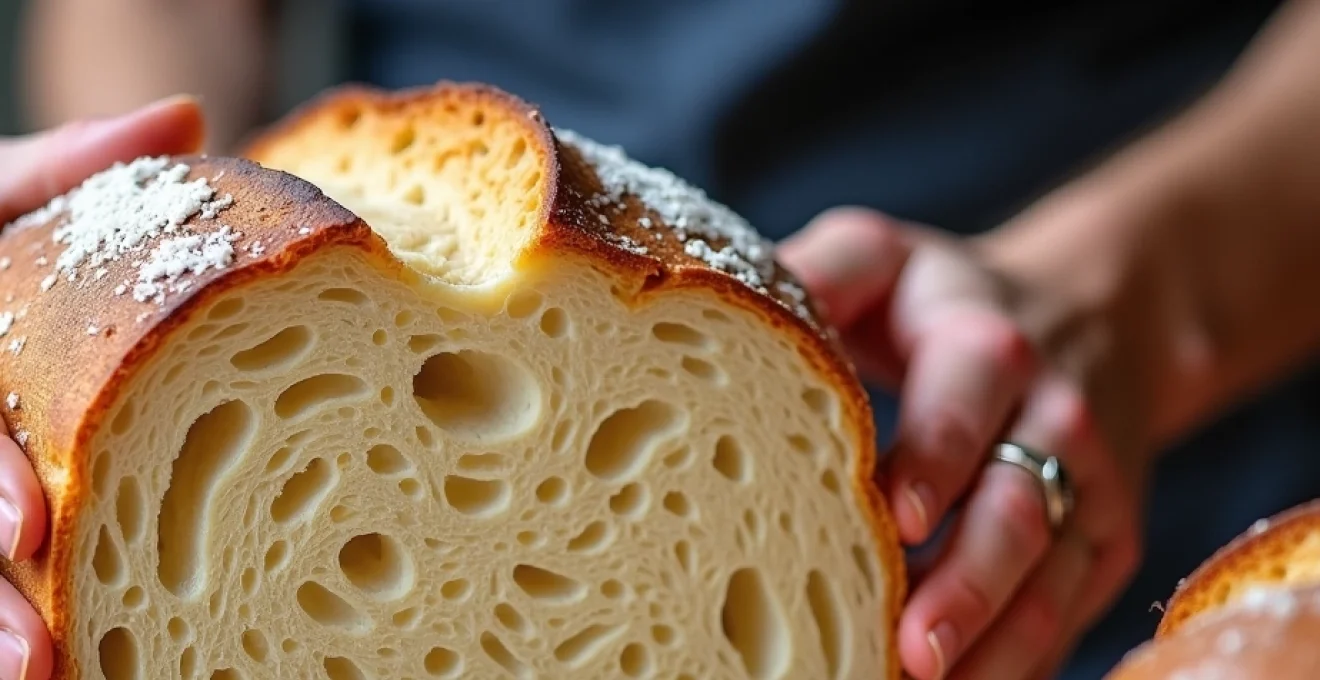
Dough hydration refers to the ratio of water to flour in a recipe, expressed as a percentage. Higher hydration doughs (70% and above) tend to produce bread with a more open crumb structure and crispy crust, but they can be more challenging to work with.
To calculate hydration, divide the weight of water by the weight of flour and multiply by 100. For example, a recipe using 1000g of flour and 700g of water has a hydration of 70%. Adjusting hydration can dramatically affect the final bread, so it’s worth experimenting to find the ideal ratio for your desired outcome.
Remember that different flours absorb water differently. Whole grain flours typically require higher hydration than white flours to achieve a similar dough consistency.
Shaping and scoring for artisanal aesthetics
The art of shaping and scoring bread is what transforms a simple loaf into a visually stunning creation. Proper shaping not only enhances the appearance but also affects the bread’s final structure and rise.
When shaping, the goal is to create surface tension in the dough while preserving the gas bubbles formed during fermentation. For a round loaf or boule, this typically involves folding the edges of the dough towards the center and then rotating it on an unfloured surface to create tension.
Scoring, or slashing the dough before baking, serves both aesthetic and functional purposes. It allows for controlled expansion during baking and can create beautiful patterns on the crust. Professional bakers use a lame , a specialized scoring tool, to make precise cuts. The angle and depth of the score can significantly influence the final appearance of the loaf.
Baking environment: steam and temperature control
Creating the ideal baking environment is crucial for achieving that perfect crust and oven spring. Professional bakery ovens are designed to inject steam during the initial stages of baking, which helps create a crispy, glossy crust and allows for maximum oven spring.
Dutch oven baking for home ovens
For home bakers, a Dutch oven can replicate the steam-injection process of professional ovens. By preheating the Dutch oven and baking the bread with the lid on for the first part of the bake, you create a sealed environment that traps the steam released by the dough. This results in a crispy crust and excellent oven spring.
Creating steam in conventional ovens
If you don’t have a Dutch oven, you can still create steam in a conventional oven. Place a shallow pan filled with boiling water on the bottom rack of your oven just before loading your bread. Alternatively, use a spray bottle to mist the oven walls with water immediately after putting in your bread. Be cautious when adding water to a hot oven to avoid burns from steam.
Baking stone vs. steel: heat retention comparison
Baking stones and steels are excellent tools for home bakers looking to improve heat retention and distribution in their ovens. While both serve similar purposes, they have distinct characteristics:
| Baking Stone | Baking Steel |
|---|---|
| Slower to heat up | Heats up quickly |
| Retains heat well | Superior heat retention |
| Less conductive | Highly conductive |
| More prone to cracking | Virtually indestructible |
Both options can significantly improve your bread’s crust and oven spring. Choose based on your specific baking needs and oven characteristics.
Troubleshooting common bread baking issues
Even experienced bakers encounter issues from time to time. Understanding common problems and their solutions can help you consistently produce excellent bread:
- Dense, heavy bread: Often caused by under-proofing or insufficient gluten development. Extend fermentation time or increase kneading.
- Flat, spread-out loaves: Usually due to over-proofing or too high hydration. Reduce proofing time or lower hydration slightly.
- Pale, soft crust: Insufficient steam or baking temperature. Increase oven temperature and ensure proper steam generation.
- Large holes in crumb: Could be desirable for some breads, but if unintended, it may indicate over-proofing or uneven shaping.
- Cracked crust: Often caused by under-proofing or insufficient scoring. Extend proofing time and ensure proper scoring technique.
Remember that bread making is as much an art as it is a science. Each loaf is an opportunity to learn and refine your technique. With practice and attention to detail, you’ll soon be creating bakery-quality bread in your own kitchen, mastering the secrets that professional bakers have honed over generations.